Unlock Bootloader, Install TWRP Recovery and Root Google Pixel 3 XL: With the amazing features including the hardware, software and overall structure, Google Pixel 3 XL has become a lot number of people’s choice. Having a clean AOSP Software this phone tends to be much easier and less intricate to operate even for the newbies. Although being stuffed with so much of specifications, you can still only add more to it. If you want to know how then keep reading our article.
By installing TWRP Recovery and rooting your device, you can make a huge number of changes to the working and software of the Google Pixel 3 XL. But how could so much fun come so easy? Due to the Flagships and A/B partition system and security hindrance, the rooting of Google phones seemed to be quite inaccessible until the latest version of Magisk popped up. And that is what we will be covering in this article.
![]()
What’s new in Magisk?
The previous versions of Magisk had the Boot image Header v0. This Magisk although was the most popular root solution (and still is), the Google Pixel 3 and 3 XL contain the Boot Image Header v1.In Google’s viewpoint, all the Smartphones that come with the Android 9 Pie need to come with Boot Image Header v1.
So if you try rooting Google Pixel 3 and 3 XL with Magisk, you will be doing a mere donkey work. As it would fail anyhow. But with the new version of Magisk, you can root Google Pixel 3 and 3 XL as well. here’s how-
Prerequisite:
- Charge Google Pixel 3 and 3 XL fully.
- Make Sure You have Unlocked Bootloader of Google Pixel 3 And Pixel 3 XL.
- Perform a backup of all of your personal data.
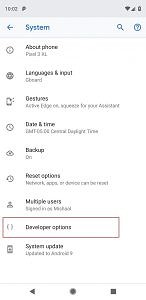
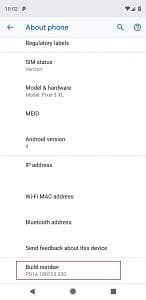
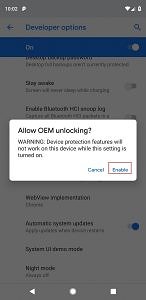
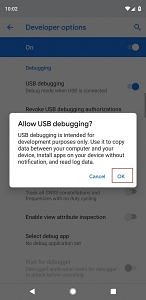
- Enable Developer Options in Google Pixel 3 and 3 XL. You can do so by- going to the Settings> System> Developer Options> Enable OEM Unlock.


- Download ADB and Fastboot. Also, extract them on PC. As an option, you can make use of Minimal Fastboot and ADB tool as well. When you install them both, open Terminal Window in the Extracted Tools folder.
For Windows, go to previously extracted “Platform Tools” Folder. By pressing the Shift Key, Right click anywhere on the empty space inside the folder. From the menu option, choose- open “Power Shell Window Here”
For Mac or Linux, Open Terminal and cd to the location of Platform-Tools folde, as below:
cd/users/ashish/desktop/platform-tools
How to install TWRP Recovery on Google Pixel 3 & 3 XL:
if you are here, I do not think what installing TWRP Recovery does to your device. And when you have a device with bootloader unlocked, you can easily root Google Pixel 3 XL with Magisk! With the guidelines given below, you can install TWRP Recovery on Google Pixel 3XL:-
- For the Google Pixel 3, download TWRP Recovery img nd installer zip.
- Move installer zip to the internal storage of Pixel 3.
- Switch your device off.
- Press and hold the Power and Volume down buttons, concurrently. This will enter your Google Pixel into Bootloader Mode.
- When in the Bootloader mode, connect Pixel 3 and your PC through USB Cables.
- Now copy the recovery img you downloaded in step 1 to the folder of”Platform Tools” in the PC.
- Apply the command below to boot TWRP Recovery img on google Pixel 3, momentarily.
.fastboot boot twrp-3.2.3-0-blueline.img
- Use the following command for Google Pixel 3 XL:
.fastboot devices twrp-3.2.3.3-crosshatch.img
- Now, your device will boot into TWRP Recovery and the screen will display- “Unmodified System Partition”. There, swipe the option of Allow Modifications.
- Press on Install option. Then go to the section where you earlier moved the TWRP Installer zip on the internal storage of your device.
- By selecting the TWRP installer zip, swipe the toggle at the screen bottom so as to flash the TWRP on your Google Pixel 3 and Pixel 3 XL, permanently.
The Google Pixel 3 and 3 XL will now boot into OS.
Root Google Pixel 3 and 3 XL:
- Download Latest version of Magisk 18.0.
- With the help of USB Cables, connect your device to the PC. Enable the Transfer Files Mode.
- Now move Magisk installer zip you downloaded in step 1 to the internal storage of your Google Pixel 3.
- Then disconnect the device and PC and switch the device off.
- Hold down Power button and Volume down button simultaneously so as to boot into Bootloader mode on Google Pixel 3 and 3 XL.
- Keep tapping Volume buttons till you come across a screen displaying- Recovery mode.
- Next, hold the power button to boot into TWRP Recovery.
- When the device is booted into TWRP Recovery, Click on Install. Select the Magisk 18.0 file.
- Now swipe to Confirm Flash.
- When the installing process is done with, Rebbot the device by tapping on the reboot option.
The Google Pixel 3 and 3 XL will be rooted. When the device reboots into OS, you will come across a Magisk Manager in your App list.
Wrapping Up:
So guys, this was how you can unlock bootloader, install TWRP Recovery and Root Google Pixel 3 and 3 XL. Hope the article came of use to you all. In case of any doubts or queries, feel free to comment down below. We will be glad to help you out.
Happy Androiding:-)