Install Android Q GSI on Project Treble devices – Google has recently released Android Q GSI (Generic System Image) which is an unmodified Android Open Source Project that can be run on Android 8.1 and above devices. You can now flash Android Q GSI to non-pixel phones as well using the Project Treble.
If you install this GSI, you will be able to experience the new Android Q system that comes with Compatibility Test Suite and Vendor Test Suite. Developers can use it for app testing and validation reasons.
In case you are looking for a way to install Android Q GSI on your Project Treble device, here is the way –

Disclaimer –
www.Androidjungles.com is not responsible for any data or other types of loss caused to your device by the method given below. Android Q is not yet official and is in its beta stage even now. Also on the Pixel devices. Thus, you will be experiencing a lot of bugs while using it. You are yourself responsible for your deeds!
How to Install Android Q GSI on Project Treble devices
By looking at the number of steps you may think that installing Android Q Generic System Image on your Project treble device is a tough task to do. But if you are doing that with complete attention, nothing will go wrong and you can easily install GSI.
Prerequisites to install Android Q Generic System Image on Project table device –
- Make sure you have an Android device running on Android 9.0 Pie.
- Do note to have a battery power of at least 70%.
- Do not forget to take a complete backup of your device data as all the data on your internal storage will be wiped out after this procedure.
- Enable USB Debugging on your Android device.
- Unlock bootloader of your device.
- Download Android SDK Tools on your PC before you start the below process.
Download Android Q GSI
- Filename – Android Q GSI Image
- Google Play Services -17.4.55
- Type – Experimental
- Upload Date – June 2019
In case you are looking for the Cor3e Google Apps and service then download –
- ARM64+GMS – gsi_gms_arm64-exp-QPP4.190502.019-5642755.zip
If you want just the basic minimum version then go for –
- ARM64 version –aosp_arm64-exp-QPP4.190502.019-5642755.zip
- x86_64 – aosp_x86_64-exp-QPP4.190502.019-5642755.zip
Check if your device is compatible with Project Treble GSI –
Before getting into Android Q Generic System image installation procedure, you must check if your device supports it. You can follow the below steps to know –
Step 1. To begin with, for installing Android Q GSI on Project Treble, you will first of all have to check if the Project Treble is compatible with your device or not. For this, firstly, connect your device to the PC using a USB Cable.
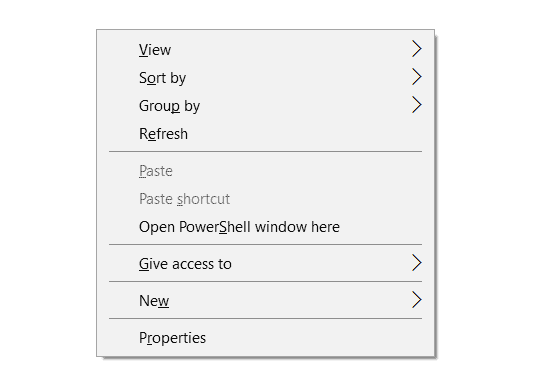
Step 2. Navigate to the folder of ADB and Fastboot and press the Shift key and simultaneously right-click anywhere in the empty space in the folder.
Step 3. You will see a list of options here, of which, select ‘Open PowerShell Window here’.

Step 4. Now enter the below command in the Window –
adb shell getprop ro.treble.enabled

Step 5. If you see the result as ‘true’ then your device supports Project Treble image and you can continue further. But if it does not show true then installation of GSI image on your device is not possible.
Step 6. The checking procedure does not end here. You will have to check for Cross-version support here by entering the commands given below –
adb shell cat /system/etc/ld.config.28.txt I grep - A 20 " [vendor]"
Step 7. Now see if you can find ‘namespace.default.isolated’ with its value ‘true‘. This suggests that your device is compatible with booting Android Q GSI on the top of the Android Pie 9.0 Vendor image.
In case the result comes out to be false, your device will then be compatible only with the GSI for the same on-device version of Operating system.
Step 8. Enter the given code in the window and check if your device is ‘system-as-root’ or not.
adb shell cat /proc/mounts I grep -q /dev/root && echo "system-as-root" II echo "non-system-as-root"
For flashing a new OS version using GSI i.e., support system-only OTA , ‘system-as-root’ is needed. This was the way to check if your device supports Project Treble image or not.
If your device proves to be compatible, then you can begin the actual procedure of installing the Android Q GSI on your Android phone.
Install Android Q GSI on Project Treble device –
Step 1. Download Android Q GSI file as per the architecture of your CPU ad then extract this downloaded file. You will come across 2 files – vbmeta.img and system.img.
Step 2. Move the above two files to the Android SDK Folder.
Step 3. With the help of USB Cables, connect your device to the PC.
Step 4. By entering the command given below, Reboot your device into Fastboot mode.
adb reboot bootloader
Step 5. Next, disable the AVB (Android Verified Boot) by entering the below command –
fastboot --disable-verification flash vbmeta vbmeta.img
Step 6. Then, wipe system partition by using the command –
fastboot erase system
Step 7. Now is the time to install the Android Q GSI on your device by entering the command –
fastboot flash system system.img
Step 8. Lastly, wipe the User data and reboot your device by typing the give commands –
fastboot -w fastboot reboot
That is it! You have successfully installed the Android Q GSI on your Project Treble device. In case you are stuck at any of the above steps, feel free to let us know in the comment box below.
List of a device supporting Android Q GSI –
-
Essential Phone
-
OPPO Reno
-
Xiaomi Mi MIX 3 5G
-
LG G8
-
Google Pixel 3 XL
-
OnePlus 6T
-
TECNO SPARK 3 Pro
-
ASUS ZenFone 5Z
-
realme 3 Pro
-
Google Pixel 3
-
Google Pixel
-
Vivo NEX S
-
Huawei Mate 20 Pro
-
Google Pixel 2 XL
-
Google Pixel 2
-
Vivo NEX A
-
Google Pixel XL
-
Vivo X27
-
Xiaomi Mi 9
-
Sony Xperia XZ3
-
Nokia 8.1
I hope the article has helped you in installing the Android Q Generic System image on your Project Treble device. Thanks to the Project Treble that you could install the Android Q system on your Non-pixel device.
Happy Androiding 🙂
