If you are looking for the TWRP Recovery for Google Pixel 3a/ 3a XL, then here is a complete article dedicated on how you can install TWRP Recovery on this Google Pixel device. Now while installing the TWRP Recovery, it is essential that the recovery can be used only on a ROM whose Kernel has LZMA Compression support.
However, the stock kernel that is preinstalled on the devices does not have this essential and hence you will first have to flash a kernel with LZMA Compression support and then flash the installer zip to install TWRP recovery on Google Pixel 3a/ 3a XL permanently. The article here helps you all with all of that. So here we go –
But before getting started, note that this is a risky method and we at www.androidjungles.com are not responsible for any damage or loss caused to your device while performing the below steps. This article is for educational purpose only.
![]()
Prerequisites –
- Make sure to have at least 70% of charging on your device.
- Unlock the bootloader of your Google Pixel 3a XL device.
- Do not forget to have a complete backup before that since unlocking bootloader will wipe out all your device data.
Downloads –
- Download the Android SDK Platform tools on your PC.
- Dark Kernel zip
- ElementalX Kernel zip
Google Pixel 3a XL – (bonito)
Google Pixel 3a – (sargo)
Install TWRP Recovery on Google Pixel 3a and Pixel 3a XL
To install TWRP Recovery on Google Pixel 3A and 3A XL, there come two basic processes which are simplified as below –
Step 1 – Boot TWRP Recovery image temporarily using Fastboot Mode
- Download TWRP Recovery image for your device from the links mentioned above.
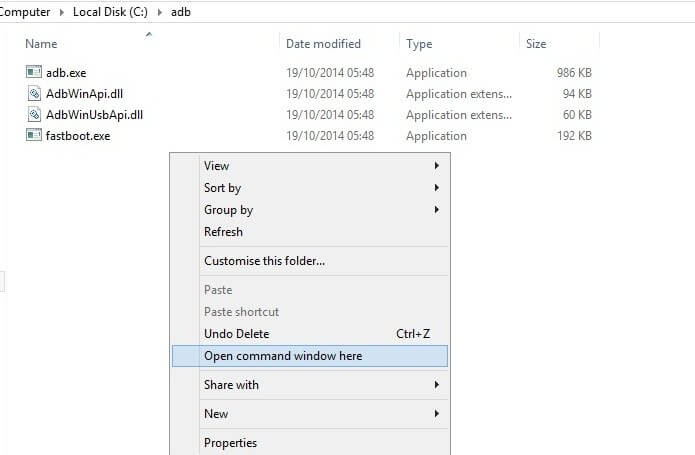
- Copy this image to the ADB and Fastboot folder and in this folder, press the Shift and Right Click on the mouse at the same time over the empty space.
- When you do so, a list of options will appear of which, select Open PowerShell Window here.

- Switch off your device when you click on the Open PowerShell Window here option.
- Press and hold down the Power button and Volume Down button together. This will boot your Pixel device into Fastboot mode.
- When your device enters the fastboot mode, connect it to PC with the help of USB Cable.
- Type the command given below to make sure that your phone is detected over the fastboot mode –
fastboot device
- You will be returned a device ID after entering this command. If not, then you may not have installed the right and updated USB Drivers, Check your drivers again.
- Then type the commands below to temporarily boot the TWRP recovery image –
Google Pixel 3a –
.fastboot boot twrp-3.3.1-1-sargo.img
Googlw Pixel 3a XL –
.fastboot boot twrp-3.3.1-1-bonito.img
- Once the above command is executed, the device will boot into TWRP Recovery mode and you will receive the ‘Unmodified System Partition’ message.
- Just Swipe the ‘Swipe to allow Modifications‘ option. In case you have set any PIN/ Pattern or Password to your device, you will have to enter it here.
- Once you have performed as mentioned above, your device will boot the TWRP Recovery Image on Google Pixel 3a/ 3a XL.
Step 2 – Flash Kernel with TWRP Installer Zip and LZMA Compression Support
- Assuming that you have downloaded the above-mentioned Kernel TWRP Installer zip and also the Kernel with LZMA Compression support, let us get into the procedure of flashing kernel with the two.
- In the TWRP Recovery menu, go to the Mount option and then choose ‘Enable MTP’ button.
- Connect your Pixel device to the PC with the help of USB Cables.
- Then move the Kernel and TWRP installer zip to the internal storage of your device.
- Then disconnect the device from PC and go back to the main menu of TWRP on Pixel 3a/ 3a XL.
- Tap on the Install button and go to the internal storage of your device.
- Choose the Kernel Zip file and then tap on the ‘Add More Zips’ option.
- Then choose the TWRP Installer Zip file.
- Lastly, Swipe the ‘Swipe to Confirm Flash’ option.
- This step will permanently install TWRP recovery on Google Pixel 3a/ 3a XL.
At last, after all of the above is finished, click on the ‘reboot system’ option and your device will be rebooted. Whenever you need to flash a kernel or a custom ROM, you will have to re-flash the installer zip so as to retain TWRP Recovery.
I assume you have found the above steps useful. In case of any doubts or if you are stuck at any of the above steps, feel free to ask us for help. you can write to us in the comment section below or on any of the provided social networking sites.
Happy Androiding 🙂