In this article, we will be sharing with you all how to Root Android 12 using Magisk patched Boot.img without TWRP. As most of you might already be aware, Android 12 is in its advanced development stage. This latest Android iteration brings along some amazing features like Nearby WiFi Sharing, Improved Privacy Settings, Wallpaper-based themes, Haptic Audio Feedback, and so on.
Indeed the latest version of Android operating system has got us all excited to taste the Snow Cone, which is the expected Android 12 name. Similarly, our tech enthusiasts might be waiting eagerly to root the latest Android version. As many of you might know, the easiest way to root Android is by using TWRP Custom recovery.
Obviously, there are other custom recoveries like OrangeFox recovery, but TWRP is most commonly used for its ease of use, wide compatibility with devices, and extraordinary features. However, as we all know Android 12 is still in its development stage, how to root it is a question on a lot of minds.
Do check – How to Check and Change Current Active Slot on Android?
Well, if you are worried that TWRP might not yet have an official Android 12 build and how to root Android 12, then keep reading further to know more. If you are wondering there you can also root other android versions without TWRP Recovery using the guide here – How to Root Android Devices Without TWRP Recovery.
How to Root Android 12 using Magisk patched boot.img without TWRP Recovery
To root Android 12, we will be using Magisk only. As the OS is still in its development stages, there is no TWRP Build for Android 12. So, we will be extracting Stock Boot.img from the Stock firmware file, then patch it using Magisk to get the Patched Stock boot.img which we will flash using Magisk.
Also, since we have only the Android 12 Developer Preview and Beta builds and not the official build yet, you will have to perform one extra step to root Android 12 device without TWRP. This would be disabling AVB and DM Verity.
Do not worry if you haven’t understood a word of this. Given below is a step-by-step guide on how to root Android 12 using Magisk without TWRP Recovery. But before you go any further, make sure to follow all the below requirements first for a smoother rooting process.
Prerequisites
- Download Android SDK Platform tools – We will be needing Android SDK Platform tools i.e., ADB and Fastboot tools as we will be using ADB and Fastboot commands to root Android 12.

- Take a complete backup of your device data.
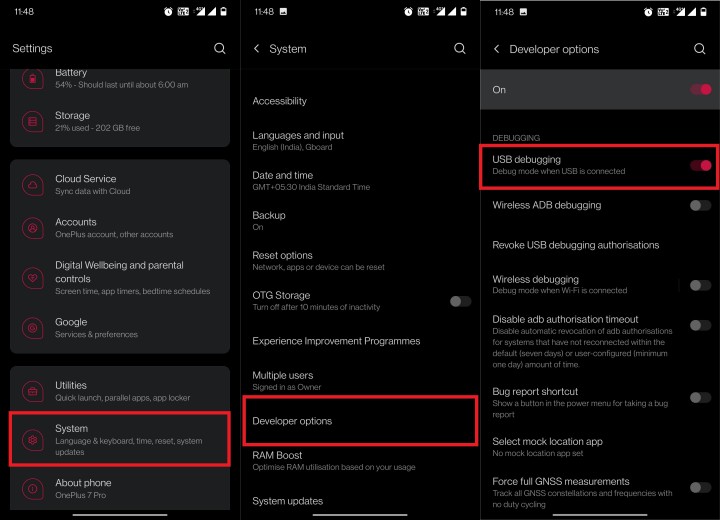
- Enable USB Debugging – In order to recognize your device by the PC for ADB mode, we will need to enable USB Debugging on your device. For this, you can either follow our guide here –
Or simply, on your Android device, go to the Settings> About Phone> Tap on Build Number for 7 to 8 times> A new Developers option will appear. Go back to Settings Main page> Tap on Developers Option> Enable USB Debugging Toggle.
Step 1: Download Stock Firmware File
To begin with, we will download Stock Firmware file. Just note that you will need to download the same version file as that is installed on your device. After downloading, extract the firmware file to any location on your PC that you want.
From this firmware, we require 2 files – one is Stock Boot.img for rooting the device and the other is vbmeta file required for disabling DM Verity. We will disable DM Verity as this is not the stable version of Android 12.

Step 2: Extract boot.img from a stock firmware
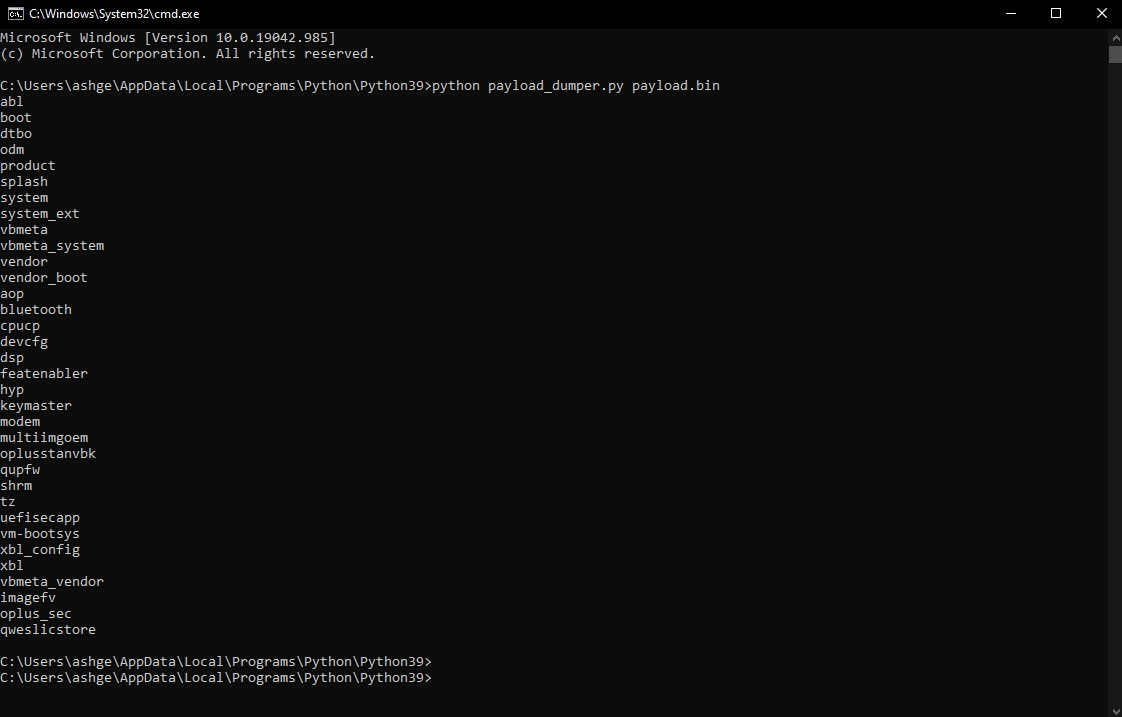
Now we will have to extract the stock boot.img file from the stock firmware file. Note that for the Pixel devices, you can just extract the firmware and get the file. But for other OEMs, you will have to follow different guides depending on the device.
For Oppo and Realme devices, you will have to extract OZIP file. For OnePlus devices, you will have to extract Payload.bin file. For Sony devices, you will need to extract Sony Boot.sin to get Stock Boot.img file.
Step 3: Patch Stock boot.img file using Magisk
- To start with, install Magisk app on your device.
- Move boot.img file to your device.
- On the Magisk app, tap on Install button.
- From the Method section, choose the option of ‘Select and Patch a file.
- Search for the extracted boot.img file and choose it.
- Now tap on ‘let’s Go’ option present at the top of the screen on right side.
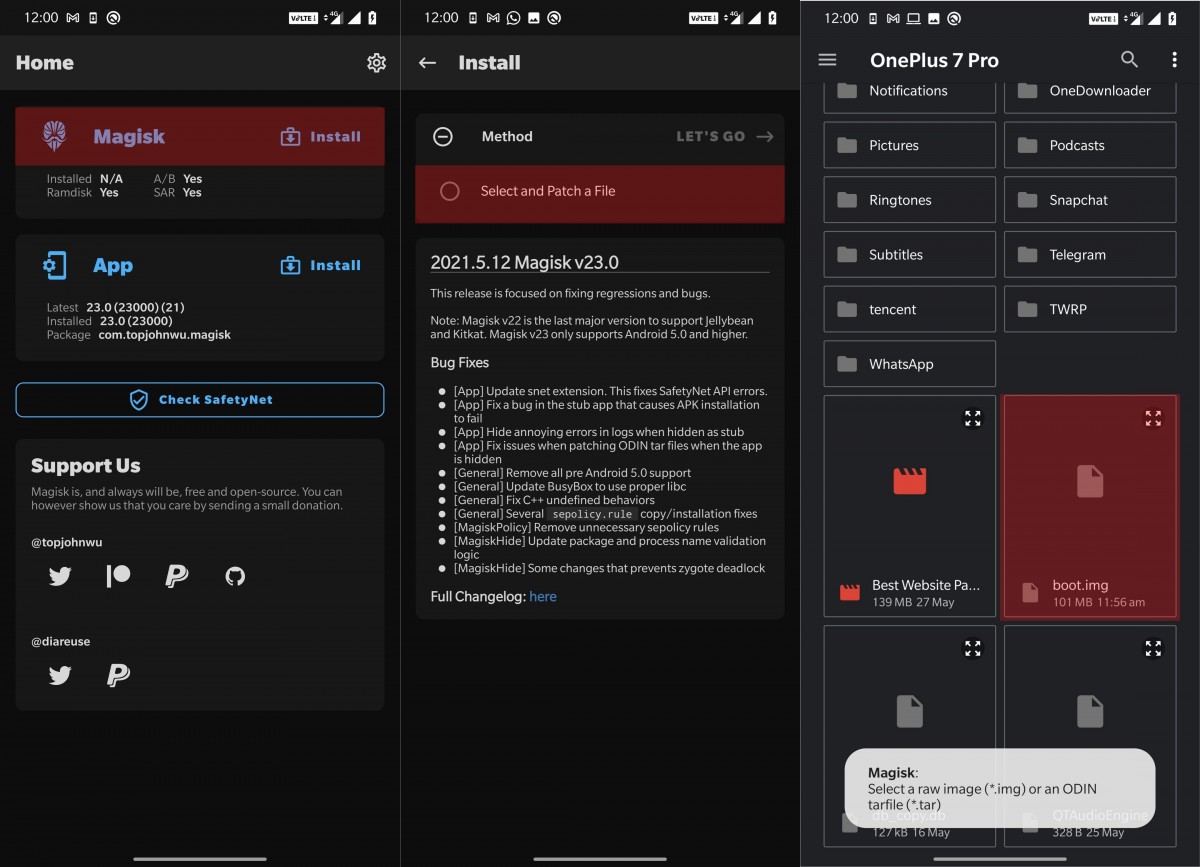
- Magisk will load the boot.img file and then patch it.
- Once done, you will get a ‘Download Complete’ message on the screen.
- The patched boot image file will be saved in Downloads section in Internal Storage. The file will be named magisk_patched.img.
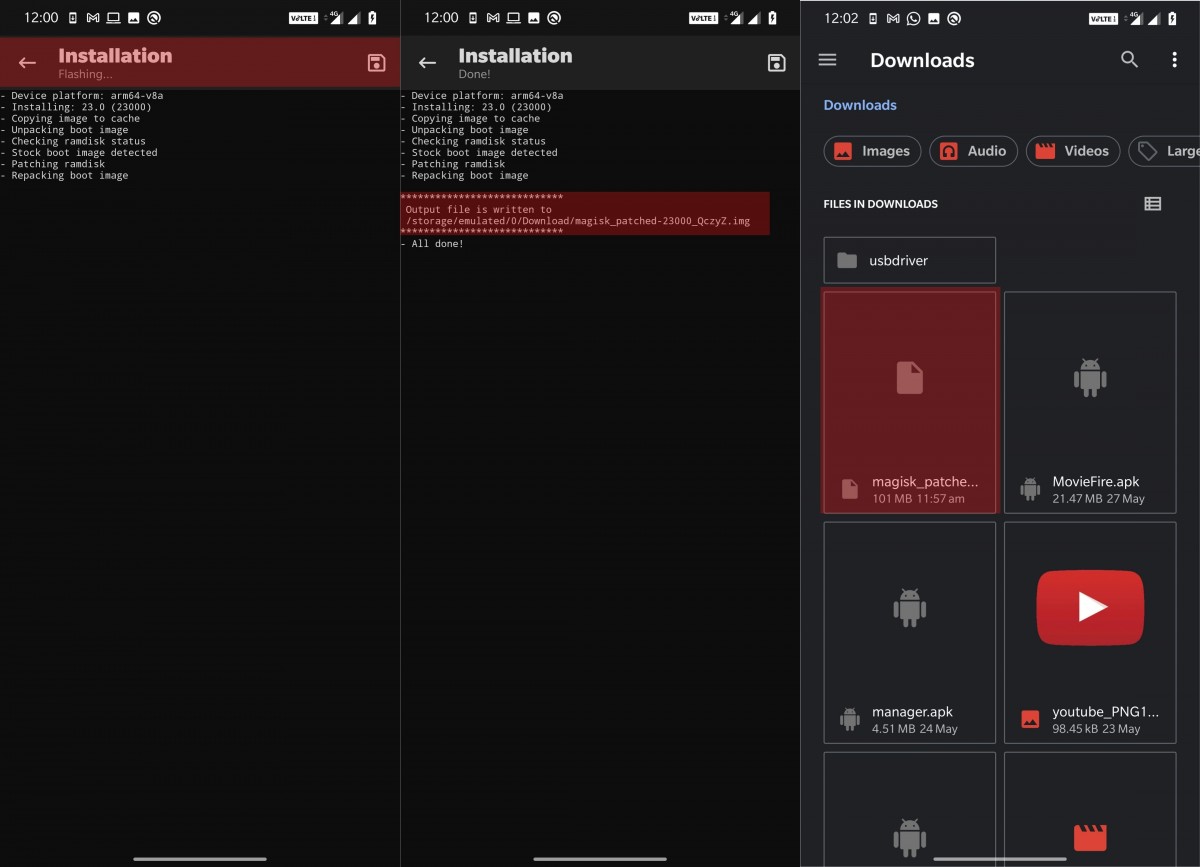
- In case there are any more characters after this name, remove them so that the file name would be magisk_patched.img.
- Now move this file to the internal storage of your device.
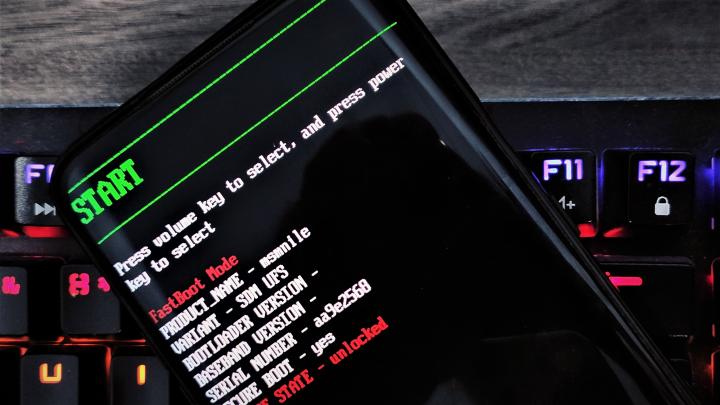
Step 4: Boot device into fastboot mode
- Using a USB Cable, connect your device to the PC.
- Go to the Platform tools folder on your PC. In the address bar of this folder, type cmd. Then hit the enter key. This will launch the command prompt.
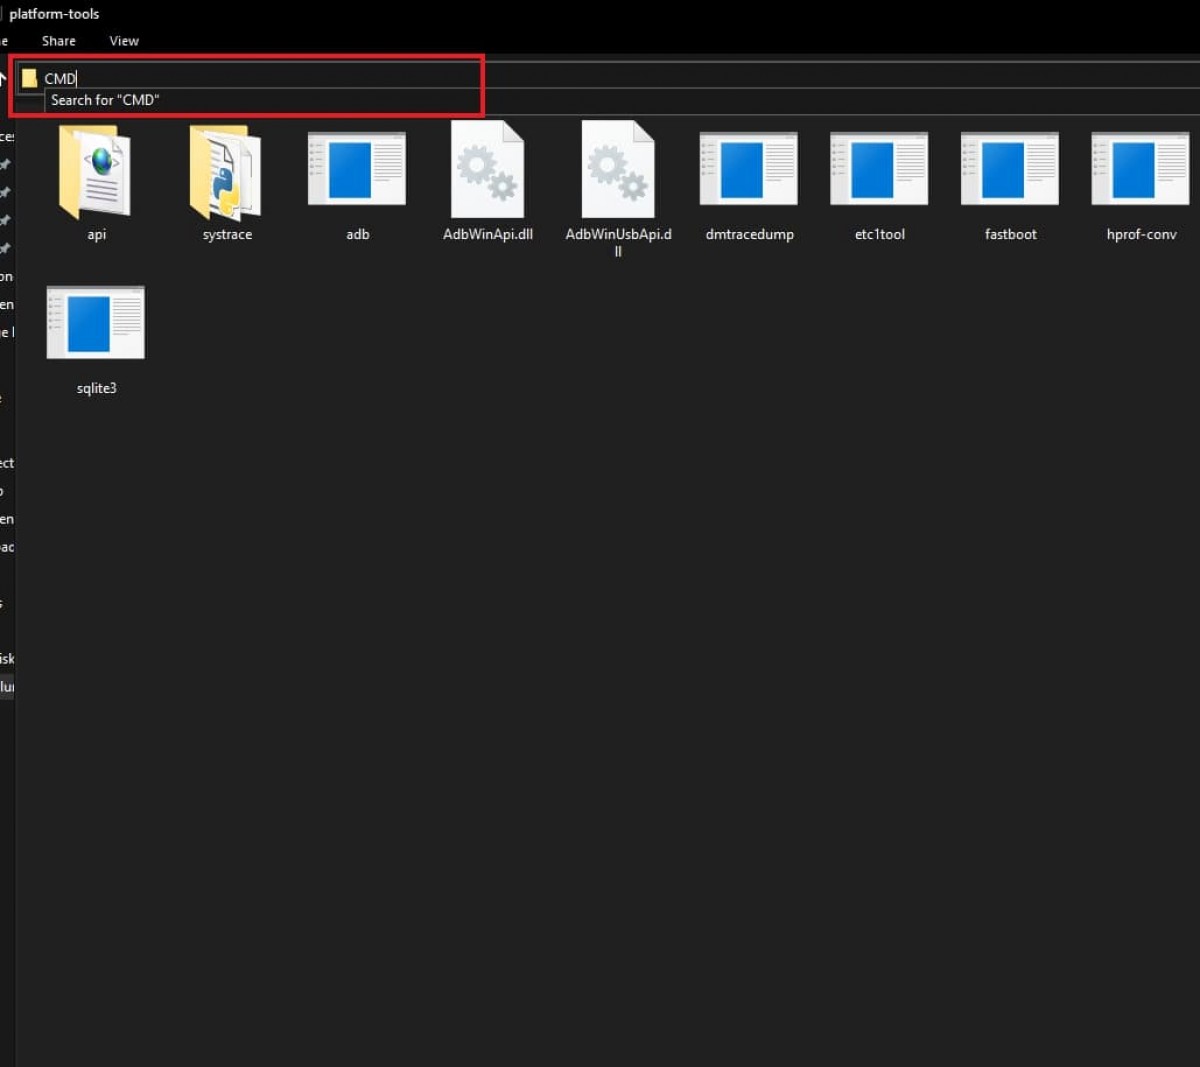
- Enter the below command to boot device into fastboot mode –
adb reboot bootloader
Step 5: Disable AVB and DM Verity
As we do not yet have the Android 12 official build, and it is still in its Beta or Development stage, we will have to disable AVB and DM Verity so as to root Android 12 device. For this, follow the below steps –
- Go to the folder where you have saved the extracted firmware file. You will see the vbmeta.img file. Move this file to the platform tools folder.
- Enter the below command to disable AVB and DM Verity –
fastboot flash --disable-verity --disable-verification vbmeta vbmeta.img
Step 6: Flash Magisk Patched Boot.img
- First of all, move the magisk_patched.img file to the platform-tools folder.
- Enter the below command in the command prompt window so as to flash Magisk patched file.
fastboot flash boot magisk_patched.img
- After you are done with flashing the file, reboot your device to the OS with the below command –
fastboot reboot
Also see –
- How to Flash Custom ROM without TWRP Recovery
- Disable DM-Verity or Android Verified Boot without TWRP
- How to Boot into Recovery from Fastboot Mode (for TWRP/Stock)
- Install TWRP and Root Android WITHOUT PC (Using Bugjaeger mobile ADB)
Concluding Words
That was how easy it was to Root Android 12 via Magisk patched boot.img without TWRP. I hope you all could easily understand how to root Android 12 without TWRP Recovery using Magisk. In case you are stuck at any of the above steps or have any queries, then ask us in the comment section below and we will get back to you soon.
Happy Androiding 🙂
