Root MediaTek ARMv8 Device: Customization on Android devices is a tech geek’s necessity. Now, who would not want to get the admin level control and umpteenth customization options on their device?
However, when it comes to devices having chipsets like MediaTek, the options still remain to be many but the methods change entirely especially for the MT67xx, MT816x, and MT817x chipsets running devices.
The usual methods of Rooting, flashing firmware, installing Custom Recoveries, etc. Do not work on most of the MTK devices. This keeps many techie geeks away from their desired customization.
You do have other options for Mtk devices like Rooting MediaTek Device on Locked Bootloader, Rooting MediaTek Device, Installing TWRP on MediaTek, etc. However, still many Mtk devices require different methods to carry on such customization processes. & here is when we come to your rescue.
As Android is an open-source operating system and with our talented developers, there’s always a way out. In this case, thanks to XDA Developer diplomatic who developed the method to root 64 bit MediaTek devices to root without any hardware mod.
So if you are looking to root your armv8 device, here we have got for you the methods that do work to root Mediatek armv8 phones. Scroll down to know-how.

How to Root MediaTek ARMv8 Device
Before we begin, the below guide is compatible with and only works for –
- MediaTek MT67xx
- MT816x
- MT817x
- or MT6580
Now the next most important thing to note here is that the below method will not give root permissions to any app but it will provide you with a command shell that will have root and administration authorities. Basically, this shell will let you execute root commands in it.
To root any MediaTek armv8 device, we will first get all the essentials by following the prerequisites and then perform the next steps to set up the root command shell.
Prerequisites
This is a crucial step as you will need the SDK platform-tools to perform further functions. Once downloaded, you will have to extract the tools to a folder which you will have to keep open throughout the process.
-
Check the CPU of your Android device.
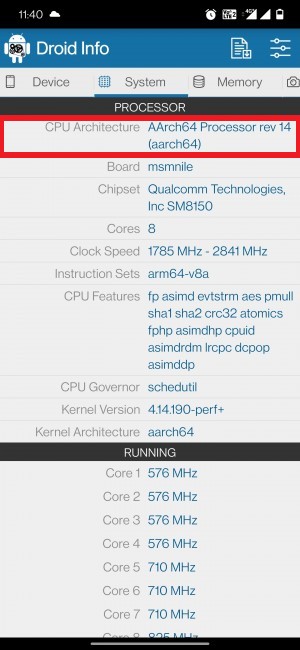
For this, you install any third-party app like DroidInfo. Once you download the app and go to System, you will find the information regarding your device CPU.

If you see aarch64, arm64-v8a, or any such keywords related to 64 numbers, it means that your device has 64-bit architecture. Otherwise, it is 32 bit.
This is an essential step as you will need to move an mtk-su file from arm64 folder to the platform folders tool for a 64 bit CPU device. And if you have 32 bit CPU, then move the mtk su file from the arm folder to the platform-tools folder.
-
Enable USB Debugging on your Android device.
For this, you can go to Settings > About Phone > Tap on Build Number 7 times [MIUI Number in Xiaomi devices] > Go back to Settings > System > Developer Options > Enable USB Debugging.
-
Root MediaTek ARMv8 device
Assuming that you have followed all the above-mentioned requirements, you can now go ahead to root mtk armv8 device –
- First off, we will start with download the mtk-su_r23.zip file.
- After downloading, extract the file to any location on your PC.
- Here, you will see 2 folders – arm and arm64.
-

root MediaTek su binary ARMv8 - So assuming that you have checked the CPU architecture of your device from the prerequisites, you have to move an mtk-su file from
arm64 folder to platform-tools folder – 64 bit
arm folder to platform-tools folder – 32 bit
- Now, assuming that you have already enabled USB Debugging from the prerequisites, connect your device to the PC using USB Cables.
- Go to the platform-tools folder. (ADB and Fastboot folder). Type cmd in the address bar and hit enter key. This will open the command prompt window.
-

command prompt adb - Enter the below command to move the mtk su file from the PC to your device‘s /data/local/tmp folder.
adb push path/to/mtk-su /data/local/tmp/
- Enter the below command to open shell –
adb shell
-

adb shell command - Now use the below command to change the directory of command prompt from the PC to the temp folder of your device.
cd /data/local/tmp
- The next step would be to add the executable permissions to the binary with the help of the below command –
chmod 755 mtk-su
- Lastly, enter the below final command.
mtk-su
That is how easy it was to Root MediaTek ARMv8 Device. The final step might take a few seconds.
But if the command is still stuck even after 15 to 20 seconds, then simply hit the Ctrl + C keys together so as to exit the command prompt window. Then again type all the above commands in the same sequence and you should see the results.
Concluding Words
I hope the above article was of use to you. The above guide will give you a command shell which has root and administrative abilities.
You don’t get root permissions for any app using the above method but what you do get is a command shell that can execute various root commands.
In case of any doubts, feel free to ask us for any queries in the comment section below. We will be glad to help you out.
Happy Androiding:-)
