In this article, we will be sharing with you all How to Flash Custom ROM without TWRP Recovery. Custom ROMs are one of the crucial parts of the customization of an android device. If you are a tech geek, you might already know that you can flash a custom ROM using TWRP Recovery.
For those, who do not know TWRP Recovery is the most popular custom recovery using which you can root an android device, Factory Reset device or wipe data, Fix boot loop, take a NANDroid backup, and so on.
However, long gone are the days when users had to rely on custom recoveries like TWRP to carry out the majority of the tasks. Nowadays, you can perform almost all tasks without using TWRP Recovery. One such task is Flashing Custom ROM without TWRP. Do not worry if you are confused, we will show you how to Flash Custom ROM without TWRP.
Benefits of Flash custom ROM without TWRP Recovery
Indeed TWRP Recovery is a very helpful custom recovery that helps with a lot of advanced-level tasks. However, not every device will have a working TWRP Recovery. Yes, a lot of devices will get the official TWRP Recovery build and the others might get unofficial TWRP builds from XDA and similar tech forums.
But what of those that are left out from both these categories? Do not worry if you have such a device which does not have a TWRP Build, this will not stop you from carrying out the necessary customization and tweaks you want.
You can still Install and flash custom ROM without using TWRP Recovery. Here is a detailed guide on how you can do so –
How to Flash Custom ROM without TWRP Recovery
For flashing Custom ROM without TWRP, we will first use a single large file called payload.bin and extract its contents using Python on PC. Follow the below steps carefully in the same sequence.
Step 1. Install Python on PC
- Open Python EXE Setup file. Here, you will see 2 options. The first will be an installation in the default directory and the second would be a customized directory. If you want to keep the Python location default, simply click on Install Now. However, if you wish to change the location where the Python file can be saved, click on Customize Installation.
-
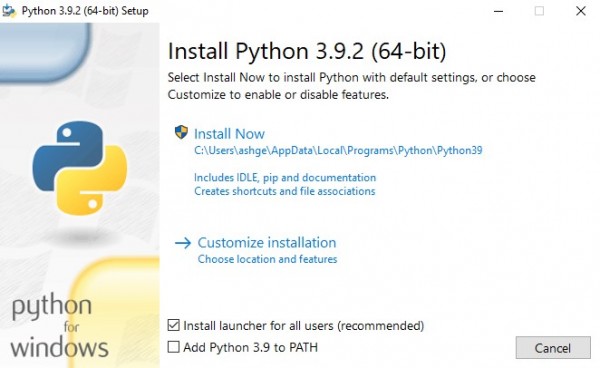
python setup - If you go with the Customized installation, make sure to remember the directory or location where you saved the Python file for future reference.
- Once the installation procedure completes, click on the Close button and proceed to the next step.
-
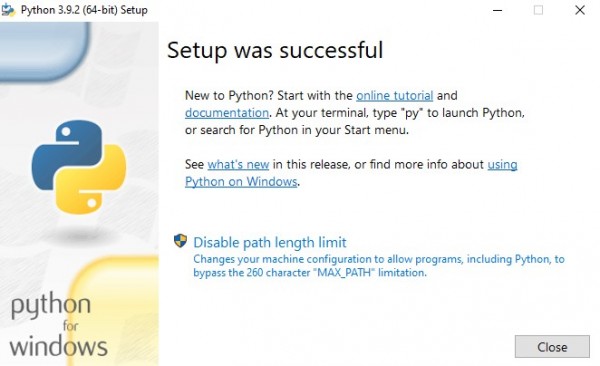
Python Installed
Step 2. Install Payload Dumper File
- In order to install the Payload Dumper file, we will have to first install the Payload Dumper tool. You can download the Payload Dumper tool using the below link-
- Now extract all contents of the Payload Dumper tool to the location where you have extracted Python in step 1.
- If you have saved Python in the default directory, then the contents extracted will be saved in the below location –
-
C:\Users\USER-NAME\AppData\Local\Programs\Python\Python <version number>
Once you have installed the Payload dumper file, you can go ahead with the next step in the process.
Step 3. Extract Payload.bin file
- We will now copy the Payload.bin file from Custom ROM and then move it to the location where we have installed Python in step 1.
-

Custom ROM - This folder will now contain 3 crucial files – Python, Payload.bin file, and Payload Dumper Tool.
-
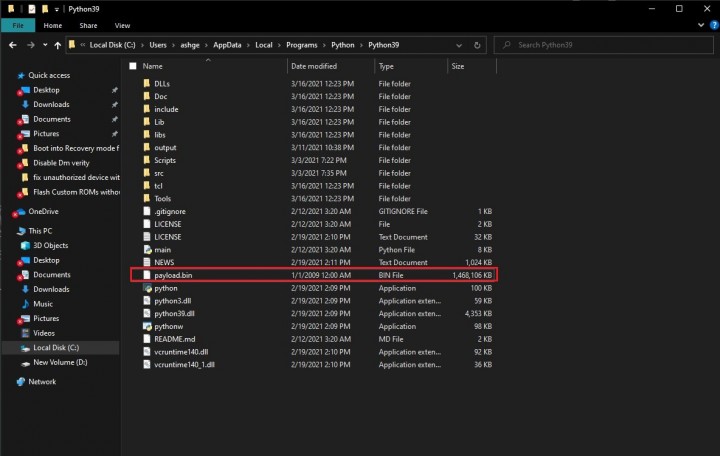
payload-bin-dumper-inside-python - We will have to open Command Prompt in this same folder. For this, type cmd in the address bar and hit enter key.
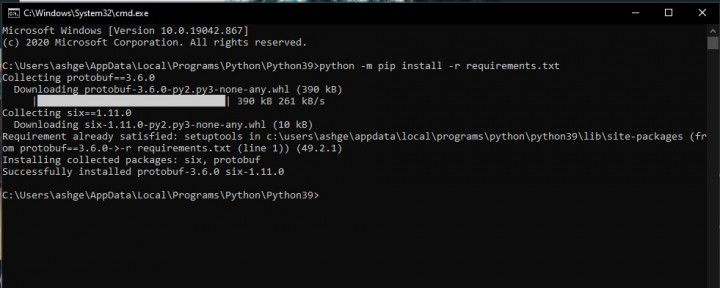
- Once the command prompt opens, enter the below command to install Protobuf dependency –
For Windows
python -m pip install -r requirements.txt
For Linux/macOS –
python3 -m pip install protobuf
- Once you execute the above commands, Protobuf will be installed on your PC.
- Now is the time to extract the Android OTA Payload.bin file using the below command –
For Windows –
python payload_dumper.py payload.bin
For Linux/macOS –
python3 payload_dumper.py payload.bin
- The contents of the file will be soon extracted depending on the size of the package. For some packages, you might get 3 files and for others, you might get a few more.
-

custom-rom-extracted-images - Once the files have been extracted, they will be placed in a folder having the name – Output. The file directory of this folder will be as below if you have saved Python in the default directory in step 1.
-

custom-rom-output-folder
C:\Users\USER-NAME\AppData\Local\Programs\Python\Python<version-number>/Output
That’s it. You can now proceed further.
Step 4. Wipe Device Partitions using Fastboot commands
When you are installing a Custom ROM, it is necessary that first all the device partitions are wiped off. But, the procedure to wipe device partitions, i.e., the fastboot commands is different for different ROMs. Hence, you will have to first check the ROM thread or you can also see their website for clarity on this.
Here are the common commands used to wipe partitions. However, we recommend you first check with the ROM Developer about which command to use.
fastboot erase userdata // erase data partition
fastboot -w // factory reset
fastboot erase system // erase system partition- before flashing a new ROM
Step 5. Flash Custom ROMs file manually
After extracting all contents of the Custom ROM, we can now begin to install them without using TWRP Recovery or any other custom recovery. For this purpose, we will be using Fastboot commands.
- First of all, Download and Install ADB and Fastboot on your PC.
- Next, enable USB Debugging. For this, you can go to Settings> About Phone > Tap on Build Number for over 7 to 8 times (For Xiaomi devices, tap on the MIUI Icon) > Go back to Settings> Tap on Developer Options> Scroll down and Enable USB Debugging.
-
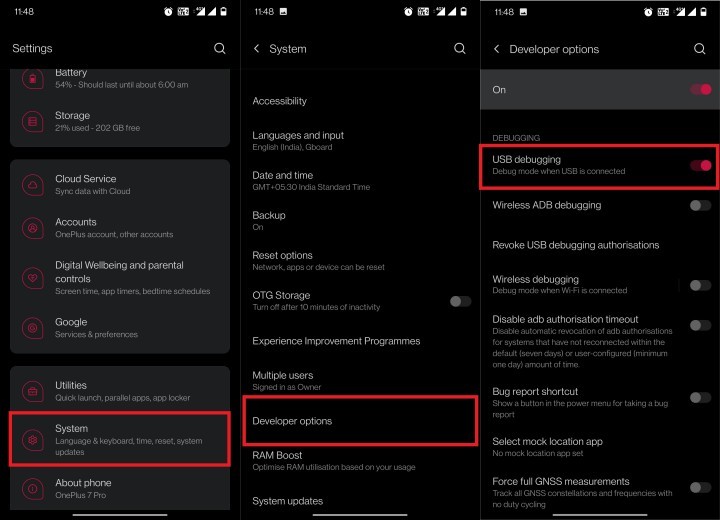
USB debugging Android - Using a USB Cable, Connect your device to the PC.
- Move all the extracted files to the platform-tools folder where you have ADB and Fastboot tools.
- Open Command Prompt in this folder by typing cmd in the address bar and hitting the enter key.
-
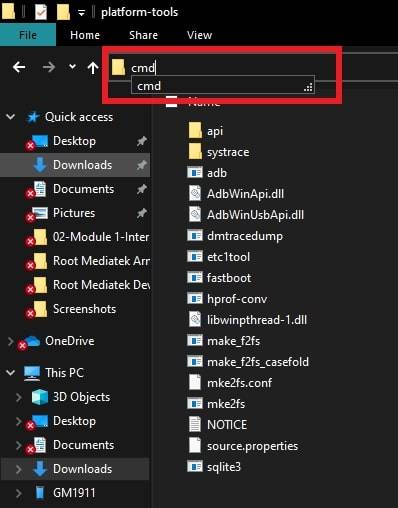
command-prompt-adb - Enter the below command to boot the device into bootloader/fastboot mode –
adb reboot bootloader

- Now enter the below command so as to flash the extracted files –
fastboot flash system system.img
- Flash the boot.img file using the below command –
fastboot flash boot boot.img
- You will now have to flash vendor.img file. Use the below command for this purpose –
fastboot flash vendor vendor.img
- In case the Custom ROM you want to install has any other files, you can accordingly use the below commands –
fastboot flash vbmeta vbmeta.img fastboot flash oem oem.img fastboot flash logo logo.bin fastboot flash boot boot.img fastboot flash dtb dtb.img fastboot flash dtbo dtbo.img
That is all. In case the ROM you are installing has any other files than the ones mentioned above, feel free to let us know in the comments section.
Fastboot Commands for devices for A/B Partition
For devices having dual partition, the fastboot commands have to be directed towards the current slot. In case your device has Current active slot A, then the below commands would be useful –
fastboot flash vbmeta_a vbmeta.img fastboot flash oem_a oem.img fastboot flash logo_a logo.bin fastboot flash boot_a boot.img fastboot flash dtb_a dtb.img fastboot flash dtbo_a dtbo.img
However, if your device has active slot B, then do not bother changing it to slot A. All you have to do is change the letter A with B in the above commands. For your ease, here are the commands you can use to flash Custom ROM if your active slot is B.
fastboot flash vbmeta_b vbmeta.img fastboot flash oem_b oem.img fastboot flash logo_b logo.bin fastboot flash boot_b boot.img fastboot flash dtb_b dtb.img fastboot flash dtbo_b dtbo.img
Devices that need flashing to both slots
In case you wish to flash Custom ROM to both the partitions of your device, you can make use of the below commands –
fastboot flash system_a system.img fastboot flash system_b system.img
However, we recommend you think twice before you go for flashing both slots.
I hope by now you were successful in flashing Custom ROM without TWRP Recovery or any stock recovery.
FAQs
Can I install Flash Custom ROM Without TWRP?
Yes, just as you saw above, using the above-mentioned guide, you can install and Flash Custom ROM without TWRP Recovery.
Is it safe to install Flash Custom ROM Without TWRP?
Yes, it is safe to install Custom ROM on your Android device provided that you are installing it from a reliable and authentic source.
Can I flash custom ROM without root?
Yes, you can flash custom ROM without root using Fastboot. However, you will first have to install a custom recovery. As, the stock recovery checks if the ROM Zip is signed or not, you will have to install Custom ROM using Custom Recovery like TWRP Recovery, OrangeFox recovery, etc.
Can I install Magisk without Custom Recovery?
Yes, you can install Magisk without Custom Recovery. For this, you can use fastboot commands.
Can I flash custom ROM with stock recovery?
Absolutely yes. You can flash custom ROM with Stock Recovery in almost all smartphones. However, you will have to root your device first.
Can I flash TWRP without root?
Yes, you can flash TWRP Recovery without Root. You will not need to root your device in order to install and flash TWRP Recovery. However, you will need to Unlock the Bootloader on your device.
Concluding Words
I hope with the help of the above article, you all could easily Flash Custom ROM without TWRP Recovery. There was a time when one had to exclusively rely on TWRP Recovery. However, the scenario now seems to have changed very well.
Even if your device does not have a dedicated TWRP Recovery build, you can always use the above method to install and flash Custom ROM without TWRP on your Android Device.
In case you are stuck at any of the above steps to install flash Custom ROM without TWRP, feel free to let us know in the comment section below. We will be glad to help you out.
Happy Androiding:-)
