This article will share all the guides on How to Boot into Recovery from Fastboot Mode for both TWRP and Stock Recovery. We have shared 3 ways in which one can boot into recovery mode from Fastboot mode. The Fastboot mode or bootloader mode is one of the most crucial modes for advanced level customization of any android device.
This fast boot mode allows users to perform various tasks related to customization like Unlock Bootloader on Android, Install TWRP Recovery, Flash Custom ROM, etc. You can also perform some other functions like restore NANDroid Backup, Flash Kernels, change the splash screen of your device, and so on.
If you are a tech geek, you might already know similar to fastboot or bootloader mode; there is also a Recovery Mode. This mode is the one that helps you with modifications and tweaks on your device. You can flash zip files, perform a factory reset and even wipe cache data using this model.
There are mainly 2 types of recoveries – Stock Recovery and Custom Recovery. The former, also known as normal mode, offers limited functions to the user. Whereas the latter offers a wider gamut for customization and tweaks like flashing custom ROMs and Modules, Xposed Framework, and so on.
So if you too want to perform such functions and enter into TWRP or Recovery mode, then here is a detailed guide that will help you boot the device into Recovery mode from Fastboot mode.
How to Boot into Recovery (TWRP/Stock) from Fastboot Mode
If you are wondering how can I reboot into Recovery from fastboot mode, then here is a detailed guide that will teach you to boot into TWRP Recovery from Fastboot recovery with 4 simple steps –
Step 1: Install SDK Platform-tools
Download And Install ADB and Fastboot on Windows, Linux, Mac
Android SDK (Special Development Kit) platform tools form a crucial part of many customization procedures. These tools are necessary as we will get the ADB and Fastboot Binary files from them.
Step 2: Enable USB Debugging
How to Enable USB Debugging on Android Devices
Since we will need to connect your device and PC for the process, you will have to enable USB Debugging on your device. You can either follow the above comprehensive guide or else continue with the brief explanation below.
- To start with, go to Settings > About Phone.
- Here, scroll to the bottom and Tap on Build Number 7 times.
-
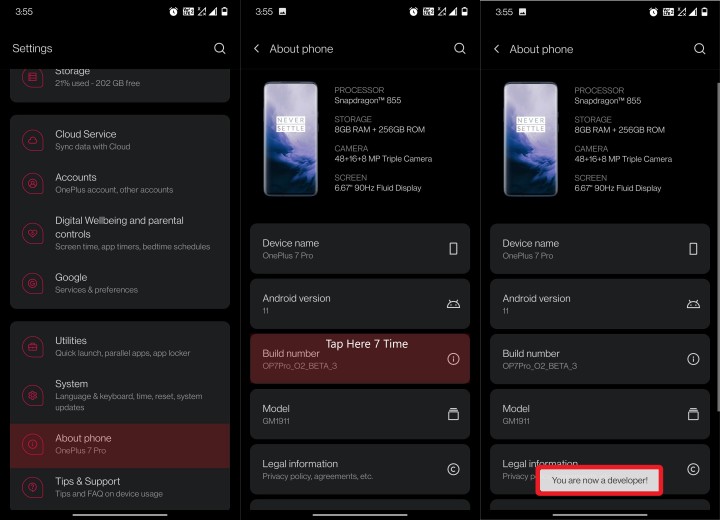
you are now a developer - Again Go back to Settings > System > Advanced.
- Here, tap on the Developer Options > and Enable USB Debugging toggle.
-
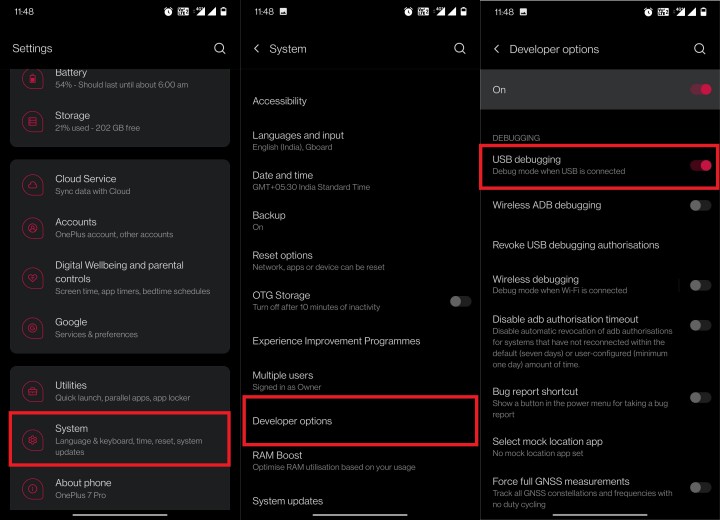
USB debugging Android 10
Step 3: Boot your device to Fastboot mode
If you are already in Fastboot mode, you can skip this step and jump to step 4.
However, if you are yet to boot the device into Fastboot mode and then boot to TWRP or Stock Recovery mode, then follow the below steps –
- Using USB Cables, connect your device to the PC.
- On your PC, go to the platform-tools folder, which you installed in step 1.
- In this folder, type cmd in the address bar and hit the enter key. This will open the command prompt window.
-
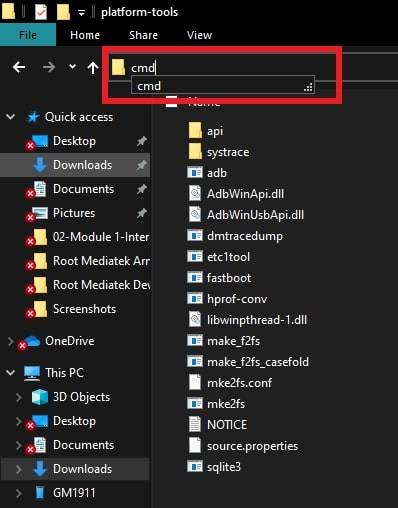
ADB Fastboot cmd window - Enter the below command to boot the device into Fastboot or Bootloader mode –
adb reboot bootloader
Now follow the below method 1 to boot into TWRP Recovery mode from Fastboot mode.
Step 4: Boot your device to TWRP Recovery
Here are 3 different methods you can use to boot your device to TWRP Recovery mode –
Method 1. Boot to Recovery from Fastboot via Commands
You can follow this method as the continuation of step 3. Assuming that you have followed step 3, your device will be in Fastboot mode, and the command prompt will be open through the Platform-tools folder.
Enter the below command to enter into TWRP mode –
fastboot reboot recovery
That’s it. This is the simplest way to boot into TWRP mode through Fastboot mode. If this method didn’t work out for you, you could still follow the other two methods mentioned below.
Method 2. Boot to TWRP in A/B Partition Devices
In case you did not find the above method useful, you can try out the below one –
- Download TWRP Recovery for your device.
- Rename this file to twrp. The file name will now become – twrp. img
- Move this file to the Platform-tools folder.
- Enter the below command in the command prompt to boot into Recovery mode from Fastboot mode –
fastboot boot twrp.img
-
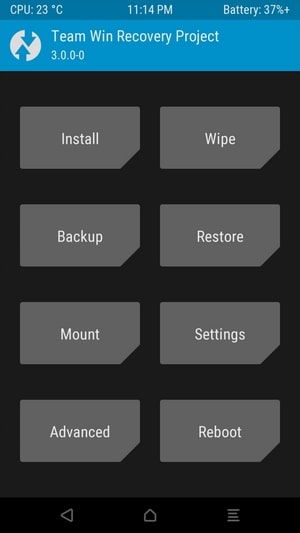
TWRP Recovery - This command will boot your device into TWRP.
- However, if you wish to install TWRP permanently on your device, go to TWRP Main Menu> Install> Install TWRP ZIP File.
For Non-A/B partition devices, you can use the below command to flash the file directly.
fastboot flash recovery twrp.img
I hope you could boot into TWRP Recovery mode using the above method. However, If you do not find this method helpful, you can try out the below one.
Method 3. Flash TWRP to Boot Partition
- Download TWRP Recovery for your device.
- Rename this file to twrp. The file name will now become – twrp. img
- Move this file to the Platform-tools folder.
- Enter the below command in the command prompt to flash TWRP IMG file to boot partition –
fastboot flash boot twrp.img
- Enter the below command to boot your device to TWRP Recovery-
fastboot reboot recovery
- Move the TWRP zip file to your device.
- In the TWRP Main menu, tap on Install and choose the TWRP zip file. Swipe right to flash the file.
- Lastly, reboot your system using the reboot option.
That is it. I am assuming by now your device will be in TWRP Recovery mode.
You can also check our guide on How to Fix Unauthorized Devices with ADB Commands.
Concluding Words
I hope you all could easily Boot into Recovery (TWRP/Stock) from Fastboot Mode on your Android device. Whether you want to boot into Stock Recovery or TWRP Recovery from Fastboot mode, the above method will be helpful for both.
If you are stuck at any of the above steps, please let us know in the comment section below. We will be glad to help you out.
Happy Androiding:-)
